
 www.mysql.com
 Opening: Dust-Free Dreams: Building Your Own Workbench with Integrated Dust Collection Are you tired of sawdust coating every surface in your workshop? Do you dream of a cleaner, more efficient workspace? Then this DIY workbench with integrated dust collection is for you! This guide provides a step-by-step approach to building a robust workbench with a built-in dust collection system, minimizing mess and maximizing productivity. Let's get started!
Step 1: Planning and Materials Before you start cutting wood, careful planning is essential. Design Considerations: Decide on the dimensions of your workbench. Consider the space available in your workshop, the type of projects you'll be working on, and your desired work height. Standard workbench heights range from 34" to 38". Determine where you will locate your dust collection port and how it will integrate with your existing dust collection system. Material List: Common materials include: Tools Required: Circular saw, miter saw, drill, screwdriver, measuring tape, level, safety glasses, dust mask (ironically!), clamps, and potentially a router (for edge profiling or creating specific joinery).
- 2x4 lumber for the frame and legs
- Plywood or MDF for the workbench top (3/4" is a good starting point)
- Plywood for creating internal dust collection channels
- PVC pipe and fittings for dust collection ductwork
- Dust collection port (compatible with your existing system)
- Wood screws, glue, and other fasteners
Step 2: Building the Workbench Frame The frame provides the structural support for your workbench. Cut the Lumber: Cut the 2x4s to the required lengths for the legs, aprons (the frame pieces that run along the top), and stretchers (the frame pieces that connect the legs lower down for added stability). Assemble the Frame: Join the aprons to the legs using wood screws and glue. Ensure the corners are square and the frame is level. Add Stretchers: Install the stretchers between the legs, typically closer to the floor. These add significant rigidity and prevent racking. Again, use screws and glue. Consider adding a center stretcher for extra support, especially for a larger workbench.
Step 3: Creating the Workbench Top The top is your primary work surface. Cut the Plywood/MDF: Cut the plywood or MDF to the desired dimensions of your workbench top. You may choose to create a single-layer top or laminate two pieces together for increased thickness and durability. If laminating, glue and clamp the layers together thoroughly. Attach the Top: Secure the workbench top to the frame using screws from underneath. Ensure the top is centered and flush with the frame. Edge Treatment (Optional): You can add edge banding or trim to the top to protect the edges and give a more finished look. A router can be used to create a decorative edge profile.
Step 4: Integrating the Dust Collection System This is the heart of your dust-free workbench. Design the Dust Collection Channels: Plan the layout of your internal dust collection channels within the workbench. These channels will collect dust from the work surface and direct it to the dust collection port. A common design involves a series of channels that run along the perimeter of the workbench top, with slots or holes in the top surface to allow dust to fall in. Build the Channels: Construct the dust collection channels using plywood. The height of the channels will depend on the amount of space available under the workbench top. Use wood glue and screws to create airtight seals to ensure efficient dust collection. Create Dust Collection Slots/Holes: Cut slots or holes into the workbench top to connect the work surface to the dust collection channels below. These slots should be sized appropriately to capture dust without allowing small parts to fall through. Connect the Channels: Connect the individual dust collection channels to each other and to the dust collection port using PVC pipe and fittings. Ensure all connections are airtight. Use clamps and appropriate PVC glue. Install the Dust Collection Port: Mount the dust collection port to the workbench, ensuring it is securely attached and properly aligned with your existing dust collection system.
Step 5: Testing and Finishing Before putting your new workbench to work, some final checks are required. Test the Dust Collection: Connect your dust collector to the workbench and test the dust collection system by sanding or cutting a small piece of wood. Observe how effectively the system captures dust. Make any necessary adjustments to the slot size or dust collection channel layout. Apply a Finish: Apply a protective finish to the workbench top to prevent moisture damage and make it easier to clean. Options include polyurethane, varnish, or oil-based finishes. Follow the manufacturer's instructions for application and drying times. Add Accessories (Optional): Customize your workbench with accessories such as a vise, dog holes, tool storage, or a power strip.
Conclusion: A Cleaner, More Productive Workshop Congratulations! You've built your own workbench with integrated dust collection. This project will not only help keep your workshop cleaner but also improve your overall woodworking experience. Enjoy your dust-free workspace and happy building!
Heavy-duty Plank Workbench
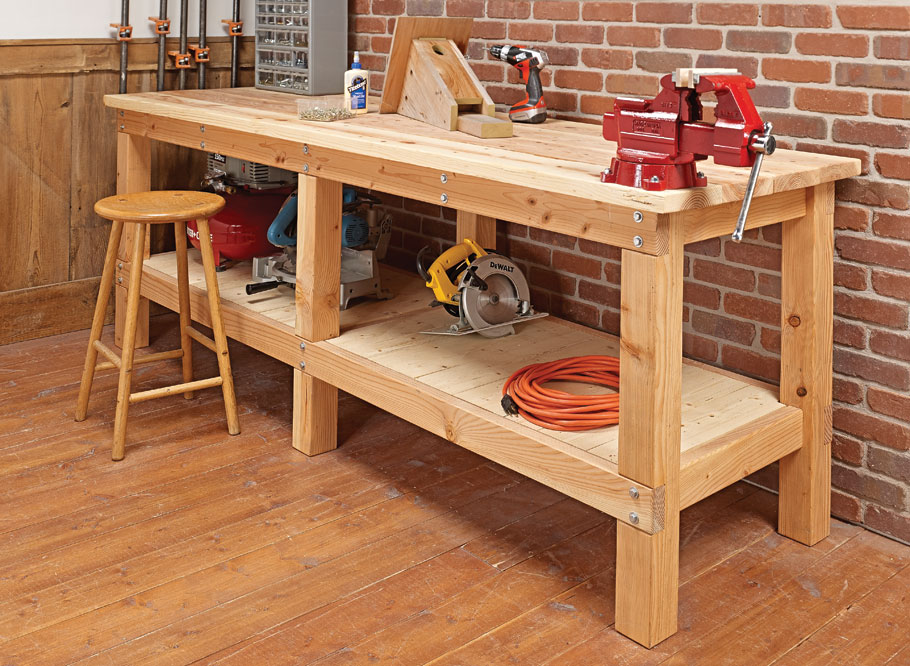 www.woodsmithplans.com
 14 Super-simple Workbenches You Can Build — The Family Handyman
 www.familyhandyman.com
 Mysql :: Mysql Workbench
www.mysql.com


0 komentar:
Posting Komentar